1/6 Scale Willys Jeep RC Conversion – Part 2

Here is the HPI GRU and motor mounted up.  The combined length is just a tad too long so I had to trim out some of the radiator which turned out ok.


It’s only a short distance from the GRU to the transfer box, fortunately I had this RC4WD Punisher Shaft in the spares box that fitted perfectly.  For now I shall be using Axial driveshafts from the SCX10 to connect the axles to the transfer case.


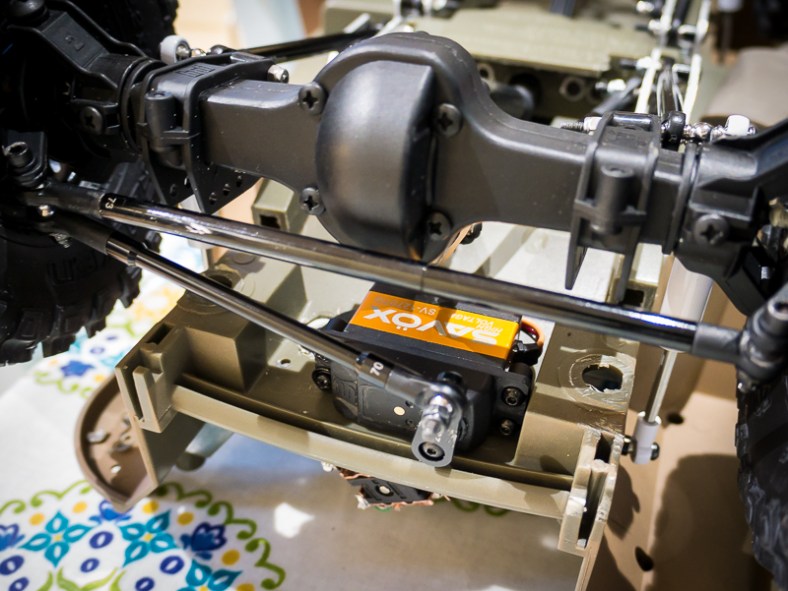
I drilled some holes to fit the servo under the body.  It’s a nice beefy Savox one which will hopefully be powerful enough to move the 2.2 Falken Wild Peaks.

P1030038

Next job was to get some paint on, I opted for this Mazda classic red which is a Halfords automotive paint.


The driver arrived from China, a 1/6 scale body with a Jason Statham head sculpt.  I pinched the clothes from my Indiana Jones figure.  ‘I want it finished you Muppet!’


I wanted a protection frame but brazing is not currently on my skills list.  I turned then instead to Pete Attryde and his scale fab shop.  He can also be found over on the excellent ScaleRC forum.  I wanted the design to resemble the one I’d seen on the 1:1 Mad Brit Willys, Pete did an excellent job.

P1030728

1/6 Scale Willys Jeep RC Conversion – Part 1

Perusing scale RC videos on Youtube I stumbled across some astonishingly realistic films of some 1/6 scale Jeeps.  These particular models had started life as G.I. Joe (Action Man in the UK) push along toys and had cleverly been converted to radio control.  Amongst the best are those created by Race730 as seen here.

There are a number of original models to choose from but by far the best and easiest to convert are the Hasbro model from around 2001-2002 and the currently available Dragon 1/4 ton truck model.

The former was as far as I can tell only available for sale in the States and examples can usually be found on Ebay.com.  The latter can be be bought in the UK for at the time of writing around £100.

The Hasbro model, if you can source one is the easiest to convert.  Already assembled it features a very sturdy, detachable, plastic chassis.  The Dragon model features a more scale looking but weaker plastic chassis that would need to be duplicated in a stronger material such as aluminium to provide the strength required for a conversion.

The Dragon model is also considerably more detailed so if you’re prepared to put in the work will ultimately result in a much more scale model.

I found a good condition Hasbro model on Ebay and as it was available via the Global Shipping Program managed to get it to the UK for a very reasonable sum.  Being a low value toy it also did not attract import duties or any additional charges.

s-l1600I sourced some aluminium links of various sizes from RCModelex and found some HPI Wheely King axles on Ebay.co.uk for a very reasonable sum.

These HPI axles are a popular choice although many people use an SCX10 rear axle with wideners to create the correct width.  The HPI axles both come with C-Hubs and knuckles as I presume the original model was 4 wheel steer.  On the rear axle therefore, these need to be replaced with lockouts, I used RC4WD ones.

I also sourced some brackets for the four link setup, in this case used Tamiya Mudblaster suspension brackets, and set about creating the links.  The brackets themselves were simply bolted onto the existing chassis using M3 hex bolts.

p1030027In order to attach the upper link to the axles I sourced some mounts from Level3 RC.  I then cut out the central cross member enough to mount an RC4WD T1 transfer case on the skid plate.  This was simply bolted on one side to the cross member.

p1030045The bonnet can be removed easily by undoing a few screws.  Underneath there’s just enough room to squeeze in a transmission and motor.  Many builds use the RC4WD R2 transmission or the transmission from an Axial SCX10.  I’ve opted to use an HPI gear reduction unit (GRU) which I trust will be strong enough, time will tell.p1030035

It was relatively straightforward to fit.  I drilled a hole in the firewall for the output shaft.  Two more holes were then drilled for the bolts to attach the unit.  Incidentally, to use this GRU you need to change the output shaft to 5mm, a suitable replacement can be sourced from RCModelex.

p1030042I was then able to hook up the GRU to the transfer case with an RC4WD Punisher Shaft that I had in the spares box.  For drive to the axles from the transfer case I’ve used Axial plastic drive shafts for now.  I doubt they will be strong enough so I’ll source some steel replacements.p1030038

For the servo, I used some Axial servo mounts and simply attached it under the truck.  I had to modify the front links a little to ensure the link mount on the axle didn’t foul against the servo but apart from that it all hooked up nicely.

Good progress so far, Indy seems happy.  Tyres are Axial Falken Wildpeak 2.2s and the shock absorbers are Superlift models from RC4WD, 100mm on the rear and 90mm on the front.p1030017

Retrochallenge In A Day, Sort Of

I began this day intending to start and finish my Retrochallenge for Winter 2016.  Of course given the on-going saga of my working and then not so much working Epson PF-10 portable floppy disk drive units, it would have fallen to virgin readers only to be amazed by my expeditious achievements.

Honesty however must prevail and this, my latest attempt to breathe reliable, long term life in to my PF-10 follows an infamous litany of countless failed attempts.

Each attempt has however brought me closer to this final crowning glory (spoiler alert.)

It’s the battery stupid.  Yep, NiCd, 30 years plus old, kind of makes sense really, especially to those of you who have completely ruined Retrochallenge by actually knowing what you’re doing, you with your big brained entryism.

A brief re-cap, the PF-10 has two batteries, both NiCd.  The main battery, removable, sits in a tray at the back.  If necessary it can be substituted for four LR14 dry cells.

The second battery resides internally and is intended as a backup for when the main battery runs low.  An LED on the front of the unit will light when the backup battery has been engaged and will flash when it starts to run low.

Initially, imagining that the main battery was probably an ex-battery (despite no leakage, none of my myriad of Epson NiCds have ever leaked) yet armed with the original power supply, duly plugged in, I naively imagined the unit would work, you know, power from the wall socket plugged in, power.

BDOS ERR ON D: BAD SECTOR

BDOS ERR ON D: BAD SECTOR

BDOS ERR ON D: BAD SECTOR

BDOS ERR ON D: BAD SECTOR

BDOS ERR ON D: BAD SECTOR

BDOS ERR ON D: BAD SECTOR

This I had concluded would be my epitaph, given the amount of times over the years I’ve sat staring at this message, often less than clearly displayed on the PX-8’s low contrast display.

To cut a tediously uninteresting story short, the on-board backup battery is required to hold a decent charge for the unit to work, regardless of how much power is being supplied from the main battery or power supply.

The hunt began to find a suitable replacement NiCd battery, no luck, I tried a NiMh, some luck but of course the on-board charging circuit is not suited.

Thus we find ourselves here today with the end looming of Retrochallenge 2016.  I found a NiCd, it has arrived, I have charged and connected it and yes it works.  Does it fit?  No, certainly not in the space inhabited by the original cells.  Not to worry however, surely it will fit the main battery compartment, no, you’d think it would but it’s off by about 4 mm.

So there you have it, I’m a ‘finding the right size battery’ away from success.  But I’m calling it, and that’s all that matters.

Retrochallenge in a day (or plugging in a battery,) beat that you losers.

P.S. I even used old pictures so I shot some shoddy video to show it working:-