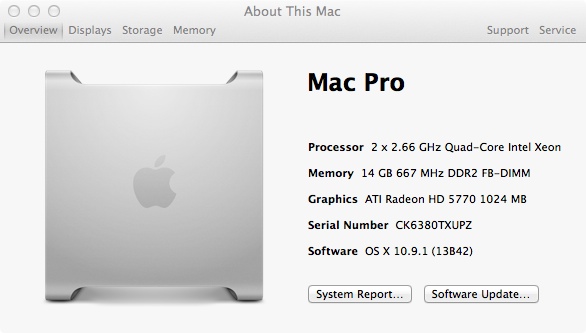
Back in 2012 I made a numer of upgrades to my Mac Pro to try to extend its useful life. The upgrades were a success and the posts I made such as upgrading the Xeon CPUs remain some of this blog’s most popular. It therefore seems likely that I’m not alone in still running one of these venerable machines.
After what seems like an eternity waiting for the new Mac Pro to arrive, as superb as it is it doesn’t suit my needs. After factoring in the costs of adding Thunderbolt equipped external storage it is also impossible to justify the cost. From a performance perspective I’m still not suffering any great hardship with my Mac Pro 1,1. However I have a number of other Macs and have become accustomed to running OS X Mavericks and would really like to be able to run it on the 1,1.
The last version of OS X officially supported for the Mac Pro 1,1 is 10.7.5 Lion. Later versions require a 64bit EFI to boot. My Pro is the very first of the Intel machines introduced and is crippled by a 32bit EFI although the Xeon CPUs are of course 64 bit. A number of hacks have been in the wild for some time and allow you to get around this limitation. The most common I’ve seen being running the Chameleon boot loader from a separate drive using legacy boot, Jabbawok created a guide.

Useful Increase Under Mavericks
Recently it has become possible, thanks to the excellent work of Tiamo over on the Mac Rumours forum to install Mavericks on the 1,1 without the need for Legacy Boot and additional drives. I actually took an alternative route to get Mavericks on to my 1,1 but still required Tiamo’s rewritten boot.efi.
Some months ago I managed to install a later, unsupported version of OS X onto both my iMac G4 and Cube. This was achieved by launching the machines in Target Disk Mode (TDM), attaching them via Firewire to my Mac Mini G4 and running the installation from there.
I decided therefore to attempt the same trick with the Mac Pro. I removed all other drives and inserted a new Crucial M500 SSD, booted the machine into TDM and attached it via Firewire to my Mavericks friendly 2010 iMac. I ran the Mavericks installation via the iMac and after initialising the new SSD installed the OS. When the installation had finished and before rebooting I used the iMac to overwrite the boot.efi in the following two locations on the new drive with Tiamo’s modified version.
usr/standalone/i386
system/library/coreservices
I find the easiest way to find these directories is to launch terminal and enter ‘open -a finder /volumes/volumename/usr/standalone/i386’ where ‘volumename’ is the name of the disk on which you’ve just installed Mavericks and ‘open -a finder /volumes/volumename/system/library/coreservices’. This will launch Finder windows with the correct directories, you can then drag the boot.efi in to place.

Velocity Solo PCI Card
Afterall you don’t want to accidentally overwrite the boot.efi on the machine you’re using to run the installation. Upon reboot the Mac Pro dutifully launched OS X Mavericks, success! After setting everything up I now have full iCloud and Internet Accounts integration with Twitter, Facebook and so on all working with the Notification Centre. As yet I have not experienced any problems. I do wonder whether any future updates from Apple may wreck things, time will tell.
One easy to resolve problem this process had left me with was that I had to remove a drive to accommodate the new SSD. I wanted to keep my previous Lion installation intact so I could boot into it when required. The drive I therefore removed contains my Windows 7 64 Bit installation which itself had involved a fair amount of jiggery pokery to get running and still gets used regularly.

SSD Attached And Ready To Install
With all my drive bays full, I have a 4tb RAID occupying the last two slots, I decided to order a Velocity Solo PCI card from Apricorn. This card will hold a single SSD and support booting from the drive.
Installation was very straightforward, simply attach the SSD and slot into a spare PCI bay and you’re good to go. You also get an additional SATA connector on the card which may come in handy.
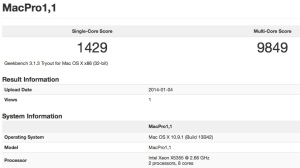
Everything is working very well at the moment, I even saw an improvement in my Geekbench score under Mavericks, an additional 400 points or so. The machine definitely feels snappier under Mavericks so hopefully, barring hardware failures, another couple of years out of this extraordinary machine.
Update:- An interesting footnote, running Geekbench simultaneously under Mavericks and Windows 7 via Parallels yields multi-core results of 7555 and 3905 respectively.
Update (24/02/2014):- Updating to OS X 10.9.2 will overwrite your boot.efi files and prevent your installation from booting. The new boot.efi file in the coreservices folder is locked and tricky to remove or overwrite. To get around this simply reboot again in target disk mode and copy the boot.efi over from another machine.
Update (27/05/2014):- Have updated to 10.9.3 with no apparent problems. It appears there is no need to restore the boot.efi after this update as it is not overwritten.
Update (15/07/2014):- Updated to 10.9.4 with no apparent problems.
Update (09/10/2014):- Updated to 10.9.5 with no apparent problems. Please note however this was done via Software Update. I have read that some people have encountered problems when downloading the combined update from Apple and applying it. This may overwrite the boot.efi so be prepared to repeat target disk mode method of restoring Tiamo’s boot.efi where necessary.
Update (07/11/2014):- Updated to Yosemite – https://retrocosm.net/2014/11/07/mac-pro-11-yosemite-install/
Update (17/04/2018):- Updated to El Capitan – Still going strong.
 There were only two things that I did differently. Firstly, instead of installing on to a newly formatted SSD I decided to try the upgrade route and install on to my existing drive thus preserving all of my installed applications. Secondly I used Pike’s new boot.efi, (thank you to commenter Ralph Sampson for pointing me in the right direction) as I believe Tiamo’s existing version will not work. More details and latest version here.


